
This guide was written by the author of the game, so you can count on it's usefulness.
- Easiest key. From the starting point just keep going right until you find a locker with the Keycard 1 inside it.
- When you see elevators, take a detour. Exploring the two short elevator areas will get you the Assault Helmet, Bandana, Ingram and Beretta.
- Once you get the 1st keycard, go back and unlock the Level 1 elevator. If you keep going straight down the Level 1 elevator, you'll end up fighting a huge group of 1337 Agents. What you should do instead is...
- Go down one level and then go right into the main building. If you explore the side rooms you'll also find items like the Sawn-off shotgun and Assault Armor.
- Once you get to the ground floor, go one room to the left and go down the elevator. If you see a sign on the left that says "LOCKER ROOMS", you're about to enter the Zombie Underground.
Going through the Zombie Underground
* Most of your enemies will be Zombies and Upgraded 1337 Agents. Zombies have a melee attack equal to the combat knife (3 damage) and have the Bloodlust ability which recharges their AP if they kill one of your guys with their claws.
- You need to watch out for the big zombie groups. You usually won't kill them all in one turn. To deal with them snipe as many as you can with guns. Don't move your guys forward so that when the enemy gets a turn, they spend their AP walking to you. They usually won't have enough AP to attack you and you'll get your turn again.
- Make sure your CQB's have a pistol on one hand and a melee weapon in the other. That way, when the zombies run up, you can use melee on them for a higher chance to hit.
Dead End at the Showers?
* Keep going left through the zombie rooms and you'll reach an area with showers. The wall has some writing on it: "The wall is a LIE" and a thin arrow pointing left. Break the wall by clicking it a few times, then go left.Dead End at the Lockers?
* Keep going left through more zombies and 1337's until you reach an elevator. Take a quick trip to the farthest room on the left to pick up the Steyr Aug. Then go back to the elevator and go up. - After you take care of a zombie/1337 mobs, go right into a dark room full of lockers. Take note that the zombies here are wearing purple rags and are tougher than regular zombies.
- Inside the locker is a set of NVG goggles. Put it on one of your guys and you'll see that the right wall is cracked. As usual, keep clicking the right wall to break it. Remember this as many of the secrets in this game are hidden behind cracked walls.
Get the Tac Mask then get to the Boss
* Go right through the broken wall and keep going, skipping the elevator. At the last room is a locker containing the Tac Mask. If any of your guys is wearing the Tac Mask, you'll be able to see your enemy's HP and ArmorClass when you mouse over. - Go back to the elevator and go up. You'll be greeted by another bunch of zombies.
- After the zombie killing, move left and you'll have a boss fight with "The Savior" aka Jesus.
Fighting the Savior
* Jesus has 8 Armor making him hard to hit. Make sure your Heavy weapons guy is equipped with the Steyr Aug rifle which ignores armor (always hits) - If Jesus runs out of HP, he can absorb the HP of any of his allies. That ally is sacrificed though.
- If Jesus runs out of allies to absorb, he'll dash to the back of the room, switch to his S&W 500 pistol and raise a wall of zombies (which he can also absorb HP from).
- After you kill all the zombies and hurt Jesus to 0HP, you'll see a cutscene and get Jesus' halo.
Getting the 2nd Keycard
* Once you've finished the Boss fight, go left and you'll find a locker containing the 2nd Keycard.
- After getting Keycard 2, go right until you unlock the Level 2 door
- You'll have to fight the big group of 1337 agents that you bypassed earlier but now you have a lot more firepower and 2x life (from the Halo). Beat them to the ground.
- Go up the elevator to the top floor.
- At the top floor, go right until you reach the room where you got the first keycard. Unlock the Level 2 door.
- Inside the unlocked room you'll find Sanford's Shorts and Sanford's Hook. These are very good equips any of your guys. I usually put the Shorts on my CQB who has the S&W500 pistol.
- After that, go left until you're almost back at the start area.
- Go up the elevator with the "Press me" sign.
- Instead of going left to the "Hats" room, go right.
- You'll fight a small group of weak guys and a locked elevator.
- Unlock the elevator and you'll find a locker containing Deimos' Jacket and the Bren Gun. Deimos' Jacket gives +1 range and some AP at the cost of some HP. It's best used with your Heavy or Assault (though i've used it at times with my CQB's) The Bren Gun is your new most powerful weapon.
- Seriously. The rest of the game will be a bit easier if you get these key items.
- Once you've got these, go back down to the ground floor.
 - Once you're at the ground floor, keep going right until you reached the Level 2 Locked door
- After the door, keep going right. You'll battle your first ATP agent.
- Once you're at the ground floor, keep going right until you reached the Level 2 Locked door
- After the door, keep going right. You'll battle your first ATP agent.Keycard 2 - Keycard 3
This section is, again, divided into several parts.- Once you're at the ground floor, keep going right until you reached the Level 2 Locked door
- After the door, keep going right. You'll battle your first ATP agent.
Fighting ATP Agents
* ATP are more skilled and have more attacks than normal and 1337 enemies. Their HP and ArmorClass varies depending on what armor they're wearing. Using the Tac Mask will help a lot when you're formulating your battle strategy. Be prepared to use Grenades a lot.
- ATP agents have a wide variety of weapons. Try to kill the ones with the strongest weapons first.
- Sometimes it's better to kill a lot of low HP agents than to focus all your attacks on a single high HP agent.
- Armor Piercing weapons like the S&W500, Aug, and 316 Sword are essential in these battles.
Moving On
* After your first ATP battle, keep going right until you reach an elevator. - Go down one level. There is a breakable wall to the right. If you go right, there's a big group of ATP agents. You might want to postpone that fight until you get more grenades. But if you do, the room after the ATP group has a locker containing the Camo+Ammo armor (+2 AP) and the JHP Ammo Upgrade that gives your SMGs a small damage boost and a 50% stun chance.
- After that, go down another level and go left. There'll be an elevator and another breakable wall to the left. The breakable wall leads to a series of rooms with a group of ATP's and a locker containing the White 1337 Suit and Glowing 1337 Shades.
- After getting the White 1337 equipment, go back to the room where you broke the left wall. Take the elevator down.
- Just keep going through the rooms heading left (no intersections for a while)
- Then you find yourself blocked by a Level 3 locked door, go back one room to the elevator and go down.
- Next, go right until you reach another elevator. Go down once.
- You'll be in a dark room with an exit to the right. There's a breakable wall on the left that leads to the Super Medkit Upgrade (medkits heal 16 HP). You can also go down to find the ATP Armor. These items are guarded by lots of ATP's.
- After getting whatever items you need, go back to elevator and head right. You should find yourself in a room with ATP cloning vats in the background.
- Keep going right until you reach another elevator. Go up.
- There'll be another breakable wall to your right if you want to explore that. Otherwise head left.
- You'll hit a dead-end that looks like a prison with destroyed bars and blood all over. There's a locker there containing the Level 3 Keycard. WARNING!!! You will be ambushed by 4 MAG Zombies if you take the keycard. No way to avoid this.
Fighting the MAG Zombies
* First thing you'll notice is you're at an awkward position with your team split apart and enemies on both sides. - The MAG Zombies have a lot of HP, but they do the same damage that a normal zombie does.
- Concentrate your fire on one zombie at a time. It'll take a few turns to kill them, so use those grenades to stay alive.
- Once you kill all the zombies, you can walk away with the Level 3 Keycard.
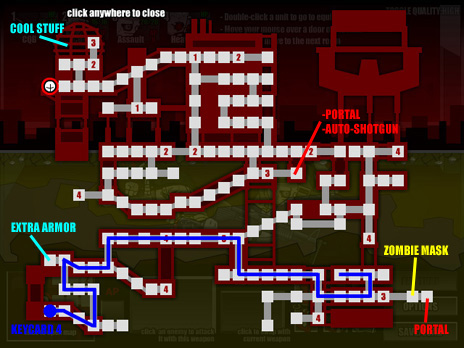
- From the Keycard 3 room, go right until the elevator, down, left until another elevator, up, left until elevator, then up again. You should end up in the room where you were blocked by the Level 3 Door. Refer to the image attached to this post if it gets confusing.
- Unlock the door and you're on your way to Club M. You'll be fighting a mix of 1337 agents and a new type of enemy: Clowns.
How to Fight Clowns
* There are 3 types of Clowns.- Saucy Clowns: wears a fancy suit and carries an axe. This Clown explodes upon death dealing 32 damage (unblockable). The blast range is 2 tiles horizontal/vertical, and 1 tile diagonally. Think of a diamond shape. The saucy clown also has a LOT of AP and should be killed immediately. It has 0 armor so use your highest damage weapons.
- Zombie Clown : wears bloody rags and has zombie hands. This Clown explodes too with the same blast range as the Saucy Clown. If one of your guys is hit, he takes 16 damage (unblockable). If the explosion hits the Clown's ally, that ally will be Zombified. It loses its weapons but its life is doubled. The Zombie Clown has less HP and can be used strategically to nullify Saucy Clowns. Why? Because a zombified Saucy clown will no longer explode.
- Disco Clown : wears a White 1337 Suit and carries a Desert Eagle. Probably the least dangerous clown. However, when he dies, he explodes like a flashbang. The effect hits all of your guys and has a chance to Stun them.
Getting through Club M
* The path is pretty straight-forward. From the Level 3 door, keep going left until an elevator, then go down.
- Then, keep going left past the rooms with giant sound speakers until you see an elevator and go down again.
- Go right past the room with the glass tables until you see another elevator then go down again.
- If you did that right, you'll be in a dark area and the disco music will be gone. Next, go left.
- Keep going left and you'll eventually run into Tricky, the big boss of all the clowns. This is a tough battle. Make sure to have plenty grenades, especially Flash Bangs.
Fighting Tricky
* Tricky has set of body guards. It's best to get rid of them first. - Tricky has two weapons, the Warning Sign and the M60 rifle. He can also jump to get in range for an attack.
- If you hurt Tricky enough, he'll get pissed at the attacker and run him over with a train. This won't do damage but it will make Tricky and your guy switch places. The train also leaves a trail of smoke, making it hard for you to hit.
- Tricky's real life bar is represented on the big Screen in the background. Whenever Tricky uses the train, his energy goes down. To defeat him, you have to lower the energy to 0.
- When you hurt Tricky with a gun, he'll just "LOL" at you. If you hit him with a melee attack, he says something else. ;)
- Tricky will sometimes bring clowns with him after his Train attack. At first it's just two, but as he loses energy, he'll bring more clowns in. These clowns are extra-unstable and will explode at the end of the enemy turn.
- BTW. Tricky is immune to Clown explosions.
Strategy
* After you kill Tricky's bodyguards, it becomes an endurance match. Equip your guys with APGain+ gear. You'll need the extra AP to reposition your guys once Tricky starts going ballistic. - Flash Bangs will make sure Tricky doesn't get to attack.
- What you have to worry about are the exploding clowns. After Tricky smokes the place up, just move all your guys as far away as possible then use a Flash Bang to stun the clowns.
- If you survive the enemy turn, attack Tricky again. When he uses his Train attack, run away and Flash Bang'''. Rinse and repeat until Tricky is dead.
- If you took the time to get SAndford's Hook, this fight is much easier.
- Bigger guns don't necessarily mean bigger damage. Tricky is pretty good at taking bullets.
And Finally...
* After you've beat tricky, you receive the PID. Careful, using it will warp you to a random part of the building. - From Tricky's room, go left. You'll find a locker containing the Level 4 Keycard. Now you can enter the Auditor's Tower.
Auditor's Tower Solution
The Tower is a maze. You'll notice that moving won't always take you to the next room. Some rooms loop back and some are dead ends. Here's how to solve it.Once you enter the tower, wander around a bit until you find a room with graffiti all over the walls. You'll see these letters all over.
" D R D U U L D B B B"
Each letter stands for a direction. The first 7 are simple enough.
- Down
- Right
- Down
- Up
- Up
- Left
- Down
If you're observant, you'll notice that although you exited Down, you enter the next room from the Left, instead of from the portal. This is important because the last 3 letters of the clue: BBB means...
- Back
- Back
- Back
If you still don't get it, first feel shame. You're not trying hard enough.
Feel it? Do you feel shame? Do you feel the rage of a thousand gamers shouting their fury at your feeble attempt?
Fine then... here's a simpler solution. Starting from the graffiti room...
- Down
- Right
- Down
- Up
- Up
- Left
- Down
- Left
- Right
- Left
Because the image is too big, here's a link to its page.
Beating the Final Battle
The difficulty of this battle depends largely on what gear you've found. For example, the people who've found the Hank Gear Set had an easy time. Some people even used the Clown Mask to suicide bomb into the enemy. There's a ton of ways you can finish this battle so in this guide I'll just outline what enemies you go up against and suggest some ways to deal with them. ImportantYour guys will probably DIE a LOT. Having a charged PID is important. If you're fighting the SAUCY's and your guy with the matching gun is killed, no PID means no resurrect means you are SCREWED. This is not a glitch. This is you going into a battle unprepared.
This is a multi-phase battle so I'll split it into waves.
Wave 1 - Ambush!
4 Super 1337s - 2 on left have Sawn-off shotguns and 2 on right have Desert Eagles2 ATP's with Steyr Aug's
- This is an ambush. The enemy gets to attack you first and you have no time to defend, reposition or use grenades.
- To survive this, have your 1st guy (CQB) and your last guy (Heavy) with high ArmorClass equipment. The Assault Armor set and the ATP Armor set are easy to find armors that have high AC.
- If you've survived the attack, just go kill them. If you've gotten this far, you've defeated stronger enemies.
Wave 2 - MAG 1337's
4 MAG 1337's - 2 on left have Sawn-off shotguns and 2 on right have Desert Eagles
- The auditor revives his ambush party but MAGnifies the 1337's giving them double HP. But overall it's the same as before, just with more HP.
Wave 3 - Botched Nuke
2 Saucys, 1 on each side - The auditor tries to nuke you but instead unleashes 2 Saucys on you. This is the first encounter with this enemy type (you can find the Saucy Gear before the battle though)
- Saucys are mimics. The weapons they have are always a weapon that one of your guys have.
- A Saucy can only be hurt by the weapon he's holding.
- When Saucy gets hurt, he'll sometime change his weapon.
- Saucy is immune to Flash Bangs
- All you have to do is look at Saucy's weapon, find your character with the same weapon and attack with it. If you run out of AP, throw a smoke grenade and wait for your next turn.
- This is much easier if two or more of your guys have the same weapon (ex. Assault and Heavy both have Aug's)
Wave 4 - Full Attack Force
2 Saucys
2 ATP's with Aug
1 MAG Zombie in Assault Armor
1 Disco Clown
- At the start of the fight, the Auditor will hit you with a smoke bomb. Since you likely won't hit anything, move your heaviest armored guy forward, throw a Flash Bang and end your turn. The only ones who'll be able to attack you are the Saucys.
- If you survive that enemy turn, you'll have pretty much full control of the rest of this wave. Just shoot, grenade, shoot through turns.
Wave 5 - Final - The Clones
1 Deimos Clone with Bren Gun
1 Hank Clone with Katana
- Deimos should be your first target. If you look closely, he throws a Smoke Grenade at the start of each of your turns. Deimos has the lowest HP of the 3 and is also vulnerable to Flash Bangs.
- Sanford should be your next target. He has lower HP than Hank and also has the annoying ability to hook people (moves his target 2 tiles closer to him)
- Hank can deflect attacks, both melee and ranged. He also has a lot of HP. He's your last target. Hank is tough but you can beat him.
- Position your guys so that your guy with the highest armorclass is closest to Hank. Everyone else should move as far as possible while still withing shot range.
- As you attack Hank and he deflects, watch your team's HP. Whenever they're low, use a medkit.
- When it's Hank's turn, he'll attack the guy closest. With smoke and armor, he shouldn't be able to do much damage.
- Just keep bashing away at Hank and you're done!
FAQ
* Q: Where is the X# keycard?!?- A: Look at the GUIDE. It's in there. There are even labeled maps that tell you EXACTLY what room it is in.
- Q: Where can I find the X equipment?
- A: I'm not telling. Finding good gear is part of the challenge. (although I think i tipped off a few in the review comments :P )
- Q: Why are there two CQB's?
- A: Because they are the most useful. The rooms are rather small so most fighting happens at pistol or melee range. This is especially true when you enter a room vertically and have enemies on either side.
- Q: Why is the Assault guy so useless?
- A: Because you're not using him properly. I found that most people just equip him with two SMG's and forget that he can use Pistols. Pistols are good in this game.
- Q: Why no level-up system?
- A: Because this is a strategy game. Think of chess. There is no level-up system in chess (apart from queening a pawn) I want players to learn to analyze the situation and use limited resources to win the battle.
Best part of equipment is that you can pass it around between team members. You're not stuck with spending skill points on an ability that will later become obsolete.
- Q: Will there be a sequel? When will it come out?
- A: Yes. But only one. It will come out in 2-3 months. I do have a day job.
- Q: Will you put an auto-save system?
- A: No because I abhor auto-saves. It makes gamers lazy. I was actually NOT going to put a "Restart from Last Cleared Room" option to punish people who don't save. But then I realized that saving data in Flash a bit unstable, so I decided to be a little more forgiving.
- Q: Why do my weapons disappear and become zombie hands when I re-spawn?
- A: It's a bug that I have tried again and again to fix. Loading usually solves this problem (assuming that you were smart enough to save your game)
- Q: Why is the tower so hard/impossible/stupid?
- A: Because you're not using your noggin. Even if you don't use the graffiti clue, you could still solve the tower by process of elimination. If you take the time to write down on paper where each door goes, you can solve the tower in 15 minutes or less. It boggles my mind that people spend hours wandering around the tower.
- Q: Why is the P.I.D. so random? It's almost useless in battle!
- A: Because it's main purpose is to revive your guys in the middle of battle (as opposed to after). The battle effects are just for fun.
- Q: Why is the last battle so hard?!
- A: Analyze your opponents and watch how they respond to your attacks. Don't click blindly. This is the culmination of all the strategy you have learned.
- Q: Why is the last battle so easy?!
- A: Because you've already grasped the techniques needed to win this game. You've probably also found the strongest equipment. Your reward for loot hunting as an easier boss fight. Congratulations!
Credits
Guide by revolverroach, edited and uploaded to the Wiki by LiquidOoze.
- A: Because you've already grasped the techniques needed to win this game. You've probably also found the strongest equipment. Your reward for loot hunting as an easier boss fight. Congratulations!