WOW, thats really good! i love the glowy things, how do you get them all swirly?
At 10/11/08 11:17 AM, killwerty wrote: WOW, thats really good! i love the glowy things, how do you get them all swirly?
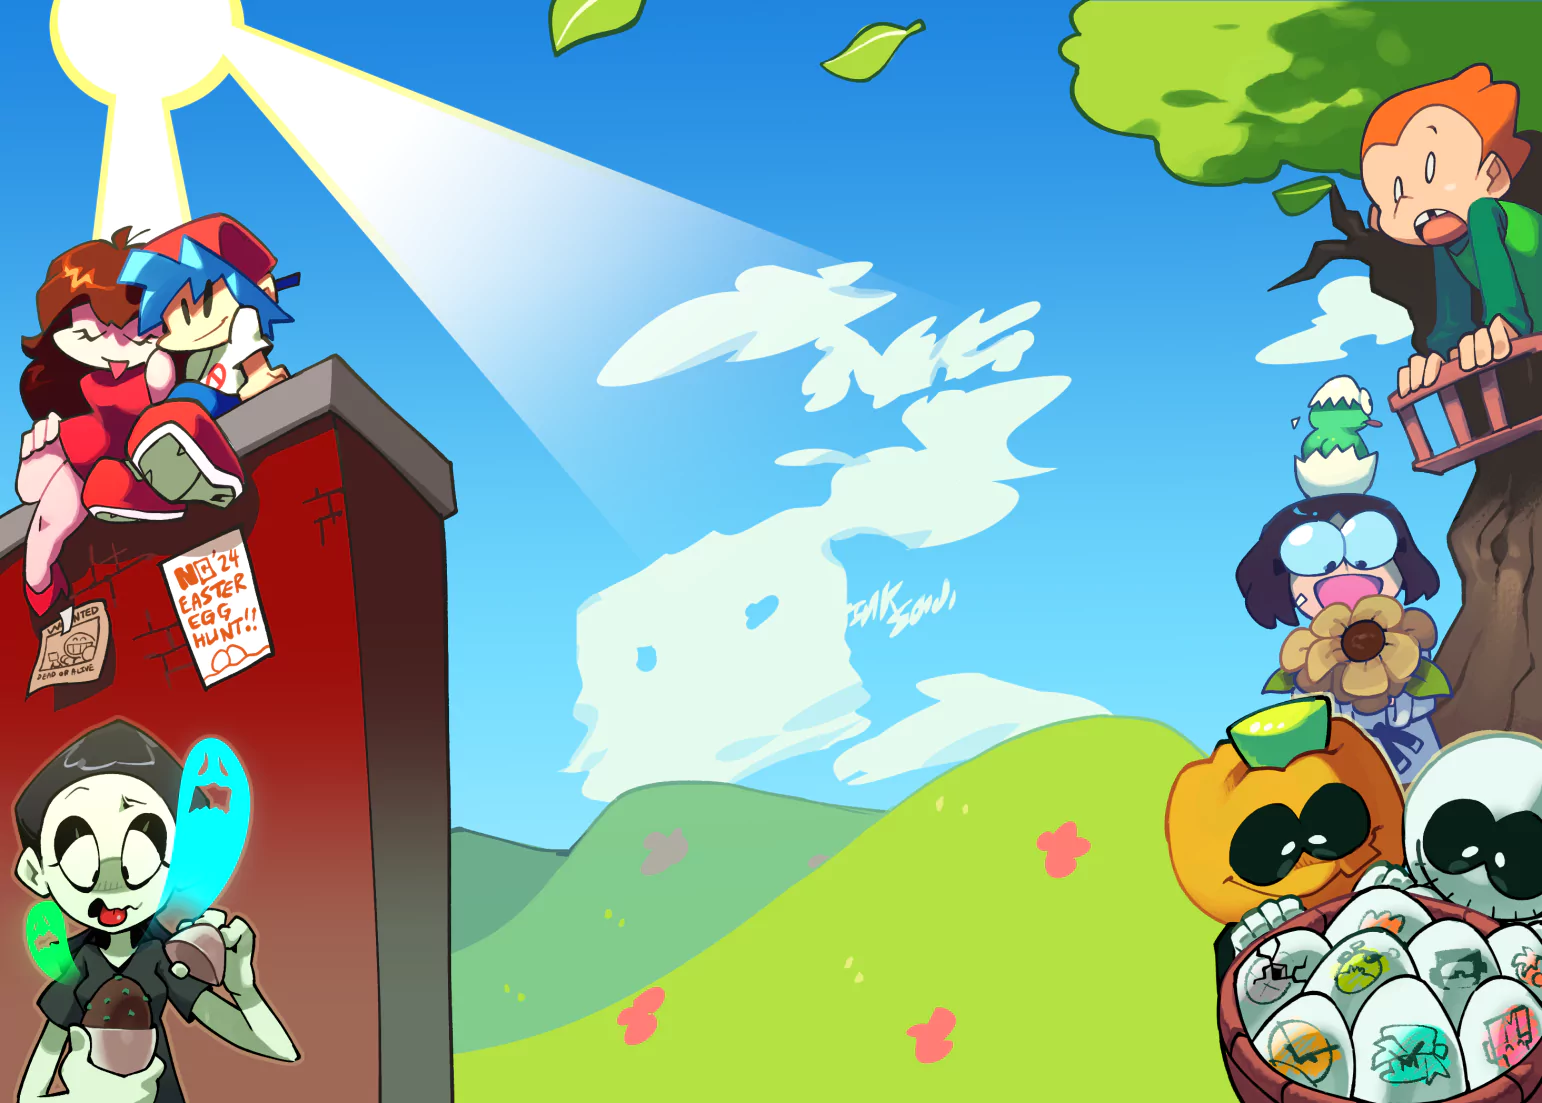
I drew the lines with the basic brushes, then I did Blending Options> Outer Glow > Set the mode to Screen > opacity to 75%, noise to 0%, colour to white, spread to 0%, and size to 29 px.

At 10/11/08 09:44 AM, Sk8erGirl14 wrote: Comments?
Nice BG! I played with it a little bit in photoshop just to see what it'd look like in diff colors or if it was even more glowy. Try this out, to anyone who wants to learn uber glow:
1) Make the whole thing 1 layer
2) Duplicate that layer, so now you have 2 layers exactly the same
3) On the duplicated layer, give it a filter > gaussian blur. make it as blurry as you want, experiment with different intensities when you see the outcome at the end
4) Now in the Blending Options menu in the layer window, set the duplicated layer to Hard Light, and play around with the opacity.
Tada, it looks like an over glowed PS3 game!


At 10/11/08 11:45 AM, STEM wrote:At 10/11/08 09:44 AM, Sk8erGirl14 wrote: Comments?Tada, it looks like an over glowed PS3 game!
lol, sweet.
Question, do you guys think it looks better as it is, or should I put it like this:
http://img60.imageshack.us/my.php?image=
previewcopyup0.jpg
At 10/11/08 08:50 AM, Sk8erGirl14 wrote:At 10/11/08 02:17 AM, Neisan wrote: Alright, last post before I go to bed. This one was right after I learned how to do "The Small Ville Effect." At least, that's what my teacher called it. It is taking a gray scale image and coloring it. Does anyone know what the actual technique is called?I think it's pretty good!
Anyway, This one was another "just for fun" project. My favorite part about her is her eyes. What do you think?
Hey, what'd you do to get the poster printed? Save the pic on a disk, went to Kinkos of Fedex and printed it there? Because I've always thought it'd be cool to design my own poster.
I think that's what happened. I had asked my teacher if he could do it for me since I don't really know how to. I'm guessing he went to Kinkos so, that would be a good place to start though they are pretty expensive from what I hear.
"To fear death, is to limit life" <---- Xin
I am a ninja for Hire =D
At 10/11/08 09:30 AM, The-One-And-The-Only wrote:At 10/11/08 02:17 AM, Neisan wrote: Alright, last post before I go to bed. This one was right after I learned how to do "The Small Ville Effect." At least, that's what my teacher called it. It is taking a gray scale image and coloring it. Does anyone know what the actual technique is called?That's what we are doing now in class. Our project is a color as a focus ad. We have to pick a project, take our own photography, and then make an ad out of it that uses color to focus on the project and everything else grayscale. I'll post a pick of it if I can find a small enough file (the project was 8.5X11 document size). As for the technique, I don't know what it is called, but I call it fun with layer masks, lol.
Anyway, This one was another "just for fun" project. My favorite part about her is her eyes. What do you think?
Sweet! I look forward to seeing it! but yeah, it is a lot of fun! =D You can do it while watching tv and stuff. My favorite thing to do is the eyes. You can make them any color you want! =3
"To fear death, is to limit life" <---- Xin
I am a ninja for Hire =D
At 10/11/08 02:25 PM, Neisan wrote:At 10/11/08 09:30 AM, The-One-And-The-Only wrote:Sweet! I look forward to seeing it! but yeah, it is a lot of fun! =D You can do it while watching tv and stuff. My favorite thing to do is the eyes. You can make them any color you want! =3At 10/11/08 02:17 AM, Neisan wrote: Alright, last post before I go to bed. This one was right after I learned how to do "The Small Ville Effect." At least, that's what my teacher called it. It is taking a gray scale image and coloring it. Does anyone know what the actual technique is called?That's what we are doing now in class. Our project is a color as a focus ad. We have to pick a project, take our own photography, and then make an ad out of it that uses color to focus on the project and everything else grayscale. I'll post a pick of it if I can find a small enough file (the project was 8.5X11 document size). As for the technique, I don't know what it is called, but I call it fun with layer masks, lol.
Anyway, This one was another "just for fun" project. My favorite part about her is her eyes. What do you think?
I tried to downsize the image, but then it looked kinda crappy so I gotta link them. The one on the far right is gonna be my final one.
http://www.facebook.com/album.php?aid=42 632&l=ae8af&id=741716447

I tried to downsize the image, but then it looked kinda crappy so I gotta link them. The one on the far right is gonna be my final one.
http://www.facebook.com/album.php?aid=42 632&l=ae8af&id=741716447
Well, well, well! That was a really great add! I personally don't like sobe much but that makes me wanna drink one... *Drinks Sobe Essential* Every well designed. Also, the text at the bottom was just like a commercial. Sweet!
"To fear death, is to limit life" <---- Xin
I am a ninja for Hire =D
Since you guys are the photoshop experts, can you help me with something technical?
Ok, so I was making someone's sig, and I went to put the name on it and the font was in 0.01 pt. This wouldn't be a problem if I could just change it back to normal, but that's not the case. Right now it says "36 pt" but when I go to type it comes out as .01. How can I fix this?
Steam: Captain Iguana
Xbl: Darth Iguana
PSN: Mayor-Iguana
At 10/12/08 12:09 AM, Carbon wrote: How can I fix this?
Highlight the text and then change it.

At 10/12/08 08:50 AM, Ryuzaki1 wrote:At 10/12/08 12:09 AM, Carbon wrote: How can I fix this?Highlight the text and then change it.
Tried it
Steam: Captain Iguana
Xbl: Darth Iguana
PSN: Mayor-Iguana
At 10/11/08 09:44 AM, Sk8erGirl14 wrote: omg omg guys!!!
I finished my wallpaper!
I'm so so excited because this is the first wallpaper I've ever made and I think it looks really good :D
Comments?
http://sk8ergirl14ng.deviantart.com/art/
Stephen-C-Anberlin-Wallpaper-100407642
it's too big to upload to NG, even with a shitty res. sorry
Lookin' good. Seem like all that hard work paid off ;)
At 10/11/08 12:17 PM, Sk8erGirl14 wrote:At 10/11/08 11:45 AM, STEM wrote: Tada, it looks like an over glowed PS3 game!lol, sweet.
Question, do you guys think it looks better as it is, or should I put it like this:
http://img60.imageshack.us/my.php?image=
previewcopyup0.jpg
I like this version without the light blue stroke around the figure much better. Now combine it with STEM ultra-glow version and baby you've got a stew going.
At 10/11/08 08:26 PM, Heinrich wrote: I'm currently taking Photography in Industrial Arts class and then Digital Design and am applying my skills in other classes. I've already done then introduction course on Photography with a 90%! I'm allowed to use Photoshop to touch up the photos I'm taking.
Killer job on the A-. A few more weeks and you'll be rocking that class with a solid A+.
Thank you, Jamoke for providing these tutorials! I'm having a blast learning new Photoshop skills!
No prob. And anytime you've got questions or want more interesting techniques to beef up that repertoire, I've got plenty more stuff that might make interesting tutorials. Next time we'll go with something a little more on the pro level so you can really wow your teacher.
At 10/12/08 08:53 AM, Carbon wrote:At 10/12/08 08:50 AM, Ryuzaki1 wrote:Tried itAt 10/12/08 12:09 AM, Carbon wrote: How can I fix this?Highlight the text and then change it.
For the life of me I can't seem to figure out what the problem is you're having. The text in Ps works just like a word processor where, like Ryuzaki pointed out, you can simply highlight the text and change the size with the drop down menu or by typing it in. Maybe if you could elaborate on the step-by-step of you process maybe we can figure out what's up.
- - - - - - - - - - - - - - - - - - - - - - - - - - - - - - - - - - - - - - - - - - - - -
It's Sunday, and you know what that means. New competition day! And I've got a delicious new theme for this week that I've been cooking for you guys.
A few days ago I was commissioned by a party who shall remain nameless to create two photoshops, the first of which shall also not be spoken of here, I have my reasons...
I'm still trying to unsee it. *bleh*
But the second one gave me a smashing idea. This week's theme shall be: FIGHT SHOP
Do you know somebody who deserves to be on the receiving end an ass stomping? Is there anyone you'd like to see get two smacks right to the fucking mouth? Want to take out your aggression on a friend, co-worker or random celebrity you just can't fucking stand?
Since Johnny Law has this nasty word called "assault" these days, it's time to brawl it out with your photoshops. Get gritty and dirty and best of all bloody.
Photoshop some people either-
-gearing up to fight,
-in the middle of a fight,
-or make them look like they just got finished with some back alley throw-down.
Here are the rules:
1. You do not talk about Fight Shop.
2. You DO NOT talk about Fight Shop.
3. Use 'shop or go Gimp, but use MS Paint and it's over.
4. As many guys to a shop as you want.
5. One shop at a time.
6. Shirts and shoes allowed.
7. Shops will go one as long as they have to.
8. If this is your first time in Fight Shop, you HAVE to shop.
Let have a good, un-clean fight, weapons allowed, hitting below the belt is preferred.
I recommend doing a little web search for "blood splatter" brush sets for this one. Check back a few pages and to around pages 6 or 7 specifically for some links to Photoshop brush add-on downloads sites that were previously posted. If anyone wants a free favor hit me up on AIM and I'll transfer you set of blood brushes that I've already customized personally, they'll come in handy greatly for this and maybe any other little projects you might work on in the future.
In the words of Mills Lane, let's get it on.
NG Photoshop HQ Competition #5: Fight Shop
Here's a pic that was sent to me via the request line of 3 young, apparently homosexual gentlemen who I've been told are musicians of some kind. I was not at all familiar with their work at the time, but I was assured that they nonetheless deserved a beating in real life. After listening to one of their songs after-the-fact, I found the photoshopping process to be rather enjoyable in hindsight. I wish I could take credit for their hair, but evidently they wear it rather messy like that on purpose for some unknown reason, so it's all seems to just flow together fittingly. Not bad for a ten minute shop I'd say.


I feel like posting this quick video tutorial that might be relevant to the competition at hand, on how to add cuts and scars in photoshop, facetiously named "How to make Emo arm cuts." Comes complete with annoying alt rock music:
http://www.metacafe.com/watch/553833/ado be_photoshop_cs3_tutorial_emo_arm_cuts_t rick_friends/
Justr a little something that came to mind with this whole election and whatnot.
Apparently, McCain and Obama decided to let their fists decide who was to be the next president.


My first ever entry. Its not very good by the standards of work ive seen on here, but i think its ok.

I added scanlines to my wallpaper:
http://sk8ergirl14ng.deviantart.com/art/
Stephen-C-Anberlin-Wallpaper-100407642
I'm still thinking about the stroke thing, because some people tell me it looks better with it, and some say do not, so I'm at a mute point right here....
...I'll begin on my entry soon.
Anyone have suggestions on making swollen lips? Clone stamp blurs it too much, and patch is hard to work with Sarah Palin's small lips.
Right behind you
Haven't done anything like this before. Should be a nice little challenge.
I mean about the contest.
At 10/12/08 08:25 PM, Peacekid wrote: Anyone have suggestions on making swollen lips? Clone stamp blurs it too much, and patch is hard to work with Sarah Palin's small lips.
Use the Liquify filter and the Bloat Tool. Set the brush to a low density and pressure, like somewhere in the 30s or 40s.
can i get some c&c on this
fullsize: http://marsupialart.deviantart.com/art/Z ero-Stinky666-Collab-100187549


LOL! He needed that. But, that bandage looks a bit cartoony to me. If you made the balck edges a bit thnner, it might fit in a bit better.


I beat up this man.
I suck at blood.


So I didn't know how to make and bruises or blood, so I messed around with the burn tool mostly. I think it turned out pretty well for what I knew how to do.
And I think I still managed to piss off a few twilight fans.

I've gotten one or two questions about how to make realistic wounds in Photoshop, so I'll cover them here for anyone who's interested.
There's no solid set of instructions, this is not a precise tutorial. These are just some (hopefully) helpful tips and guidelines for technique. Keep in mind there's always more than one way to do something in Photoshop and it's all about familiarizing yourself with the many tools and features at your disposal. If you have a hard time being creative it probably means you simply need more practice, that's all, so don't go getting discouraged.
Tips for Making wounds and injuries w/Photoshop
1. Cuts & Scrapes
Exotic brush presets can be a big help in this regard. You can download some "blood" and "splatter" brush sets for free here:
http://getbrushes.com/texture-photoshop-
brushes/kerens-blood-brushes-vol2.php
and
http://www.bittbox.com/freebies/free-hi-
res-splatter-photoshop-brushes/
and
http://qbrushes.com/misc/shad0ws-blood-b rush-set/
Alternatively, you can always try to freehand it or use the line tool to make basic lacerations and smudge, liquify or blur them later on.
Remember to use a nice darker shade of red for blood, nothing too bright and bad special effects make-up looking, and also don't use the brush directly on the picture itself, always make a new layer to work on top of. That way you can go back and smudge, blur, darken or add shading to the blood for more realism.
Take advantage of the fading option after each brush stroke by going to the drop down Edit menu and selecting Fade Brush. You can also just as well adjust the opacity/fill level of the layer on the workspace pallet, or use the Sponge tool.
2. Bruises & Dirt
One of the simplest effect to pull of, just use the Burn tool set to a low hardness and a low exposure. To make more realistic bruises, I used the Color Replacement tool to add patches of black, blue, and for a little flare some green, fading each color after applying. To achieve an even more believable effect, use brushes that simulate realistic brush strokes or textures, or download a set of "grunge" brushes for some excellent texture:
http://getbrushes.com/grunge-photoshop-b rushes/javierzhx-grunge-notion-brushes.p hp
http://www.photoshopbrushes.com/grunge-b rushes.htm (also has a good blood slpatter brush set)
And as always, remember to work on a separate layer so it's easier to fix mistakes.
3. Bumps & Swelling
Possibly THE simplest effect, Filter > Liquify, then use the Bloat tool set on low density and pressure. You can also go to Filter > Texture > Pinch and use the filter to make 3-D "swells" on the image. Be sure to use the Elliptical Marquee tool to make small highlights on an area you want swelled first. After that, use the burn tool and give it some texture and shading.
--------
Again, it's really all about using your imagination and having a good eye for detail- those are the two most important tools when it comes to photoshop. Hone your skills and practice often.
At 10/14/08 12:36 AM, THEJamoke wrote: You can also go to Filter > Texture > Pinch and use the filter to make 3-D "swells" on the...
*Filter > Distort > Pinch
Clearly, there's more than just one fight that Palin was destined to lose.


At 10/13/08 10:00 PM, The-One-And-The-Only wrote:And I think I still managed to piss off a few twilight fans.
You. Bastard.
Thanks for posting those links! If I have time I think I'll revise mine now.
At 10/14/08 07:15 AM, Sk8erGirl14 wrote:At 10/13/08 10:00 PM, The-One-And-The-Only wrote:You. Bastard.And I think I still managed to piss off a few twilight fans.
And if I do revise it's only gonna get worse.


